
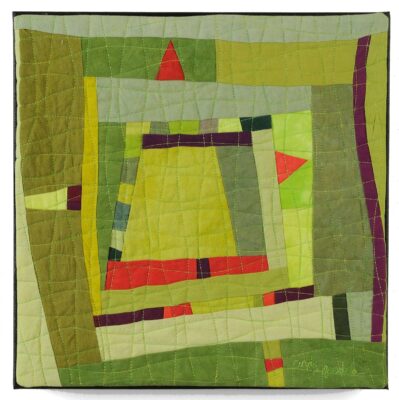
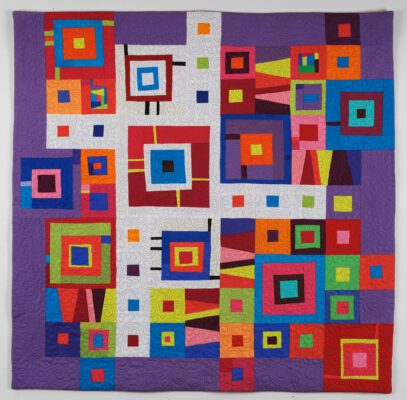
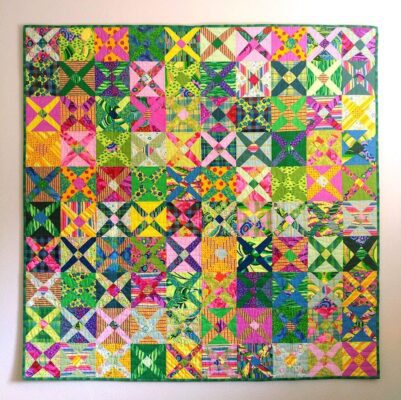
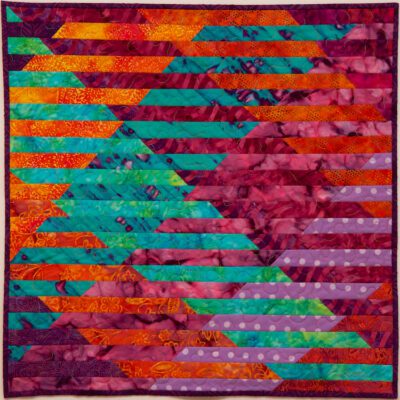
Improv Log Cabin
Make an Improv Block the center of your composition. Add your own borders if you’d like to make it bigger–maybe curved strips or asymmetrical open space–it’s completely up to you to make your quilt your own. This process can be adapted to any size quilt–use your imagination! We will discuss the improv block technique using scraps and different ways to set the block into an interesting design with border options.
SUPPLY LIST
- Rotary cutter and mat – I like the 60mm rotary cutter, but bring whatever size you like best, with a new blade
- Rulers—suggest 9” square and 6” x 12”
- Basic quilting supplies including straight pins, seam ripper, scissors and/or snips for cutting threads, measuring tape
- Batting or flannel to use as a “design wall”
- Notebook and pen or pencil to take notes
- Digital camera or phone to take photos of design options (optional)
- Artful Improv by Cindy Grisdela
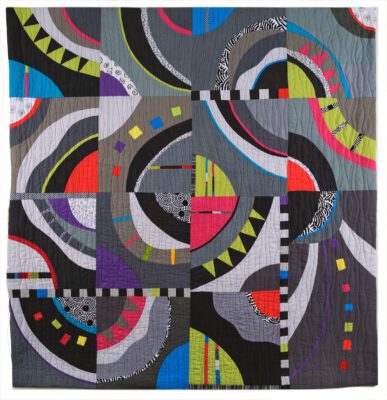
Fearless Curved Piecing
Take the fear out of curved piecing with two different Improv Circle techniques. There’s no template, no pins, and no matching seams. You’ll be confident with curves in no time!
Class Supply List
- Learn to piece curves with no templates—even pins are optional.
- 8-12 fat quarters in a variety of colors that you like together- can be solids or prints or both. Remember to include a range of values—light, medium, and dark. You may also bring scraps that are at least 8.5” square. To make a small wall hanging, you’ll need about 40 squares.NOTE: if you want to make a color wheel quilt like
- Playing with Colors, you’ll need a wide variety of solids or prints or both (I used batiks) in red, orange, yellow, green, blue and purple. You won’t be able to make all of them in class, so
I suggest either choosing one color to work with or bring 4 fabrics in each color. - Rotary cutter and mat – I like the 60mm rotary cutter, but bring whatever size you like best, with a new blade
- Rulers—suggest 9” square and 6” x 12”
- Basic quilting supplies including straight pins, seam ripper,
scissors and/or snips for cutting threads, measuring tape - Batting or flannel to use as a “design wall”
- Digital camera or phone to take photos of design options (optional)
- Adventures in Improv Quilts by Cindy Grisdela
Sew your smaller scraps into Improv Blocks or add skinny lines to larger scraps to make units that go together like a puzzle. There are no right angles or straight lines unless you want there to be! We’ll focus on sewing our units together using expressive lines–gentle curves that follow the shape of the elements used, rather than a hard squaring off process. You can also use leftover or orphan blocks in your composition if you like.
Supply List
• Sewing Machine with manual – with a ¼” foot (required)
• Rotary cutter – I like the 60mm rotary cutter, but bring whatever size you like
best, with a new blade
• Cutting Mat –I like 24” x 36”
• Rulers if desired—we won’t really be using them much
• Basic quilting supplies including straight pins, seam ripper, neutral thread,
scissors and/or snips for cutting threads, and measuring tape
• Batting to design and transport your quilt
• Paper and/or notebook for making notes, sketches, and drawings about your quilt
if desired
• Digital camera or phone with the ability to take pictures
• Blue painter’s tape
• *optional but helpful – Artful Improv: Color Recipes, Building Blocks & Free Motion Quilting and/or Adventures in Improv Quilts by Cindy Grisdela
• Fabric – Strips and scraps of cotton fabric in solids, or fabrics that read as solids, such as tone on tone and small-scale prints. You may include some print fabrics too but recommend avoiding large scale prints. If you don’t have strips and scraps handy, you can bring fat quarters, charm packs, layer cakes, or jelly rolls.
Remember to have a range of values—lights, mediums and darks.
Remember that part of the fun is to make do with what you have. Sometimes limitations on supplies or fabrics actually enhance our creativity.
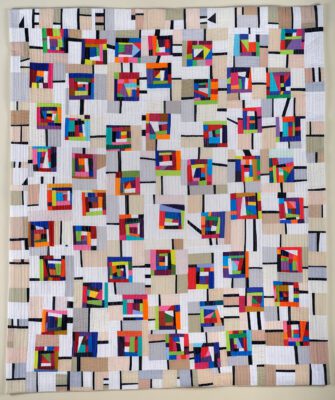
Improv Puzzle
Create Improv Log Cabin blocks in a variety of sizes and put them together into a unique composition–like a jigsaw puzzle. There’s no measuring or precise cutting and each quilt will be unique. We will discuss color choices and using simple design principles to create an original dynamic composition.
Supply List
• 8-12 fat quarters in a variety of colors and values (black and white are
additional). You may bring scraps too.
• Rotary cutter and mat – I like the 60mm rotary cutter, but bring whatever size you like best, with a new blade
• Rulers—suggest 9 1/2” square and 6” x 12”
• Basic quilting supplies including straight pins, seam ripper,
scissors and/or snips for cutting threads, measuring tape
• Batting or flannel to use as a “design wall”
• Notebook and pen for taking notes
• Digital camera or phone to take photos of design options (optional)
• Adventures in Improv Quilts by Cindy Grisdela – optional but helpful
Fabrics
Bring fabrics in colors that you like together—for example warm colors like red, orange, yellow or cool colors such as blue, green, purple. Or you can use an “anything goes” color recipe. You don’t need a lot of any one fabric—variety is important. Be sure to include different values of your colors—light, mediums and darks—and consider adding a few fabrics in a contrasting color or value to add an accent. Consider including black and white too.
You can bring all solids or a combination of prints and solids.
We’ll talk about color and design to create the composition as well as the techniques needed.
SUPPLIES
• 8-12 fat quarters (18”x 22”) or equivalent in a variety of values—lights, mediums, and darks – you will cut these into 15” squares, which can be done before class if you wish.
• Rotary cutter – I like the 60mm rotary cutter, but bring whatever size you like best, with a new blade
• Large cutting mat—at least 18” x 24”
• Rulers—suggest 15” square and 6” x 12”
• Basic quilting supplies including straight pins, seam ripper, neutral thread, scissors and/or snips for cutting threads
• Batting or flannel to use as a “design wall”
• Notebook and pen or pencil to take notes
• Digital camera or phone to take photos of design options (optional)
• Optional but helpful: Adventures in Improv Quilts by Cindy Grisdela

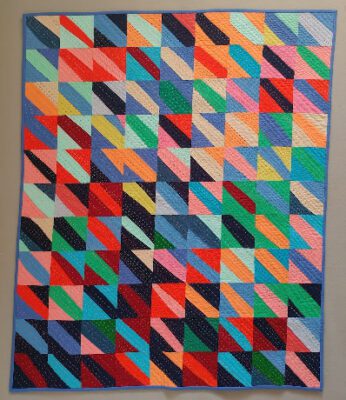
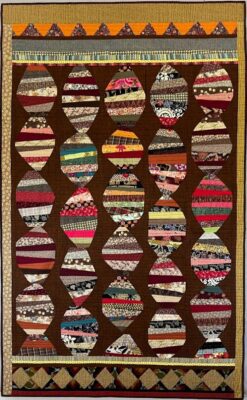
Improv Curves and Stripes
Learn to create Improv Curves and Angled Stripes to make this cheerful wall hanging. Even if you’ve never sewed curves before, you’ll be confident in no time, because there are no pins, no templates, and no seams to match. Use your favorite colors and fabrics in solids, prints, or a combination.
Class Supply List
Learn to piece curves and stripes with no templates—pins are optional!
• Fat quarters in a variety of colors that you like together- can be solids or prints or both. You may also bring scraps that are at least 9” square. For a quilt like mine, you’ll need 8 warm colors (red, orange, yellow) and 6-8 cool colors (blue, green, purple).
• Rotary cutter – I like the 60mm rotary cutter, but bring whatever size you like best, with a new blade
• Rotary cutting mat
• Rulers—suggest 6.5” square and 6” x 12”—or your favorite square and
rectangular rulers
• Basic quilting supplies including straight pins, seam ripper,
scissors and/or snips for cutting threads, measuring tape
• Batting or flannel to use as a “design wall”
• Notebook and pen or pencil to take notes
• Digital camera or phone to take photos of design options (optional)
• Adventures in Improv Quilts by Cindy Grisdela – optional but helpful
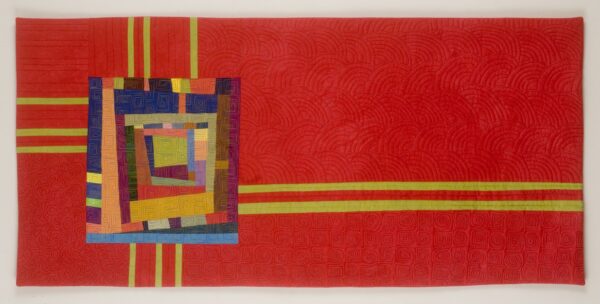
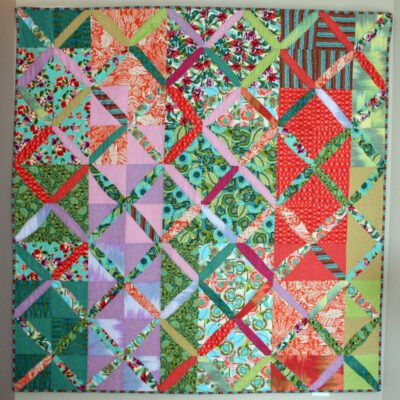
Color Grid Log Cabin
Use your scraps to piece a colorful Color Grid design using Improv log cabin blocks and neutral backgrounds with skinny black lines. The design can be put together either symmetrically where all the blocks line up, or asymmetrically where none of them do. It’s your choice. The neutral borders with black lines provide an interesting grid-like structure that supports the Improv blocks. Scraps can be all the colors or more structured—only blues, or reds, oranges and yellows, for example. Solids, or prints, or a combination will all work.
Fabric
Strips and scraps of cotton fabric in solids, or fabrics that read as solids,
such as tone on tone and small-scale prints. You may include some print fabrics too but recommend avoiding large scale prints. If you don’t have strips and scraps handy, you can bring fat quarters, charm packs, layer cakes, or jelly rolls. Remember to have a range of values—lights, mediums and darks. Include scraps that are are neutral in value—white, bone, ecru, gray—as well as black to make a quilt like mine.
SUPPLY LIST
Rotary cutter – I like the 60mm rotary cutter, but bring whatever size you likebest, with a new blade
• Cutting Mat –I like 24” x 36”
• Rulers if desired—we won’t really be using them much
• Basic quilting supplies including straight pins, seam ripper,
scissors and/or snips for cutting threads, and measuring tape
• Batting to design and transport your quilt
• Paper and/or notebook for making notes, sketches, and drawings about your quilt if desired
• Digital camera or phone with the ability to take pictures
Remember, half the fun is using what you already have on hand.

We will discuss color choices and how to use simple design principles to create an original dynamic composition.
Supplies:
- Rotary cutter and mat – I like the 60mm rotary cutter, but bring whatever size you like best, with a new blade
- Rulers – suggest 9” square, 6″ x 12″ rectangle, and your favorite long ruler
- Basic quilting supplies including straight pins, seam ripper, scissors and/or snips for cutting threads, measuring tape
- Batting to design and transport your quilt
- Paper and/or notebook for making notes, sketches, and drawings about your quilt.
- Digital camera or phone with the ability to take pictures
- Blue painter’s tape
- *optional but helpful Adventures in Improv Quilts by Cindy Grisdela
Fabric:
You don’t need to buy fabric especially for this class unless you want to. Bring a box or small suitcase of fabrics that you like together, remembering that it’s important to have a range of values from light to medium to dark so you will have contrast in your work.
If you want to be specific, bring fabric representing the color wheel—red, pink, orange, yellow, green, blue, turquoise, purple. Also include neutrals including black and white, and brown and gray in a range of values.
Part of the fun is making do with what you have. It’s fine to bring solids, prints or a combination. Scraps or fat quarters are also fine, but you will need some yardage if you want to work with the large free hand cut curves.
CHOOSE ANY 17″ or under PATTERN YOU WISH!! Patterns designed by Laura Heine at www.fiberworks-heine.com
Three options, this 1 day workshop will be offered THREE TIMES during our cruise.
Jo Lynn O’Neil is a certified Laura Heine instructor. She will be teaching collage classes as follows:
We are offering this 2 day collage workshop three twice during our cruise. If you choose both workshops, you may work on one or two Laura Heine projects.
During our time together, you will learn Laura Heine’s collage technique with all the in’s and out’s and special methods Laura recommends.
We will be making a Collage quilt using Teeny Tiny patterns by Laura Heine. Each pattern makes a quilt approximately 16”x20”. You can use one of the patterns pictured here or choose any of Laura’s Teeny Tiny pattern. You may see all of the patterns by going to www.fiberworks-heine.com, then searching for Teeny Tiny. You will pull up both kits and patterns. There are many to choose from.
As the techniques are the same, you may choose from any of the Teeny Tiny quilt patterns
Come join us for a fun no stress class. You will have some homework as there are limited irons available on the cruise ship.
I also encourage you to purchase a kit from the Laura Heine website. In the long run it will be less expensive and less weight for your luggage. However, if you have fabric in your stash that you would like to use that is fine. The pattern is not included in the kit and you must purchase it separately. Follow the fabric and materials list on the pattern you choose if you are bringing your own fabrics.
** Please do not bring one of the larger patterns, we don’t have room on our tables to accommodate these.
Your homework is to have all of your fabrics fused before you get to class. You must do this!
Supplies:
- Laura Heine 17″ or under pattern and/or kit of your choice
- Steam a Seam 2 fusible (not lite)
- Applique Pressing Sheet
- Black Sharpie pen and a pencil
- Pattern Ease- see pattern for amount
- Sharp fabric scissors—I love Karen Kay Buckley’s perfect scissors, the (blue handle) works especially well for this
- Pins
- Tweezers-optional
- Background fabric-again check your pattern.
Please contact me if you have questions.
Jo Lynn O’Neil
Two Color Fusible Reverse Applique – 1 Day
Choose your favorite two color applique pattern from Pacific Rim Quilt Company to make a delightful reverse applique wall quilt.
You will only need 2 fabrics for this fun and relaxed class where you’ll learn the art of fusible appliqué, a quick and easy technique that’s perfect for quilters of all levels. This method allows you to fuse your fabric pieces in place before stitching, making it a breeze to create intricate designs without the need for precise hand sewing.
All you’ll need are a few fabric pieces and fusible webbing, and you’ll be ready to start. Whether you’re new to appliqué or an experienced quilter looking to try a new technique, you’ll love how accessible and portable fusible appliqué can be.
During class, Jo Lynn will also share tips on design and finishing, plus insights into the history and evolution of appliqué quilting. It’s a great opportunity to relax, sew, and chat with fellow quilters while creating something beautiful.
Come join us for a day of stress-free stitch-free creativity, and good company!
Supplies
- Purchase any two color applique pattern by Pacific Rim Quilt Company. You can order online at prqc.com
- Yardage requirement for quilt is on the back of pattern for requirements for more blocks. About 30” by width of fabric for top fabric and 30” by Width of fabric for back fabric
- Choose two contrasting fabrics for your quilt top and a coordinating print fabric for the backing, I used Batik fabric but 100% cotton will work.
- I recommend using wool batting for ease of quilting and beautiful results to show off quilting, you will not need this on the cruise.
- Wonder Under about 30”
- Thread for appliqué. I love to use Aurifil 100% cotton #60 thread. It needs to match the Applique fabric not the background fabric.
- Thimble
- Scissors, small and sharp to the point. I like Kai brand scissors—about 3 to 4 inches long, or Karen Kay Buckley with green or blue handles. You will also need paper scissors.
- Paper copy of your pattern
- Marking pencil. I like SewLine. You must have a color that will contrast with the Applique fabric.
- You will be preparing this for machine appliqué. That will not be done during class. I will meet with you during free sew time and demonstrate machine appliqué. The machines will be available during free sew time for you to appliqué your project. Bring Thread to match your project.
Questions, contact JoLynn at Jolynn.oneil@gmail.com
Humming Bird – Hand Piecing
Discover the art of hand piecing in this relaxing one-day class, led by Jo Lynn O’Neil. Jo Lynn is passionate about sharing the tranquil joys of this portable, often-overlooked quilting technique. In this workshop, you’ll have the option to purchase pre-made stamps before the cruise or create your own templates for a personalized experience.
The project—a charming and simple wall hanging—will come together effortlessly as you use spare moments in your busy schedule to work on it. Choose any fabric you like, though using scrap fabric with a unified background can yield especially stunning results.
Join us for a day of stress-free sewing, where you’ll have time to chat and bond with your fellow quilters, all while learning a rewarding, time-honored craft.
SUPPLYS
- Download and print a copy of Hummingbird pattern! This is a free pattern found on
https://www.quiltingdaily.com/product/5-free-quilt-patterns-civil-war-quilts/ - 32 (4” x 6”) rectangles of assorted medium and dark prints for stars
- ¼ yard light colored for diamonds
- Border, backing and binding fabric will not be needed on ship.
- Quilt template stamps by Kate- www.bykate.com She has clear stamps that are very easy to use.
- I highly recommend these. You will need 2 stamps and an ink pad.
- If you don’t by stamps you will need template material and scissors to cut it with.
- Fabric marking pencil such as sew line products in a color that will show on your fabric. You will need something that makes a fine line. Unless you are buying the stamps.
- Needles-I like sharps/applique #10 Hiroshima by Tulip or Clover Black Gold are very good. Or bring your favorite hand piecing needle.
- Hand sewing thread-Aurifil, Mettler, Presencia, or your favorite. Color to match your fabric—I like taupe or gray tones
- Thimble
- Scissors sharp to the point. I like the small Kai or the green or blue handle scissors
by Karen Kay Buckley. - A small battery powered light you be helpful. The lighting is not great on the ship!
- Also, if you need cheaters!
Join us to have a great relaxing day!
Jo Lynn O’Neil 940-659-8134 jolynn.oneil@gmail.com
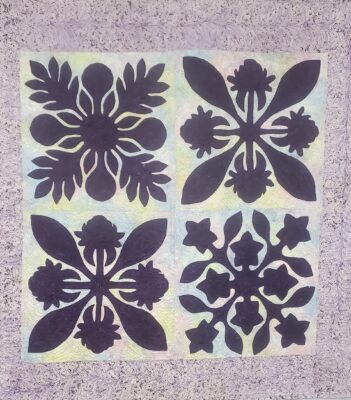
Traditional Hawaiian Applique
A laid-back and enjoyable class where you’ll explore the beautiful art of Hawaiian appliqué using the needle turn technique. This method is simple and portable—just two colors of fabric and one color of thread are all you need to get started, making it a great project to take with you on the go.
The patterns we will be working with feature gentle curves and soft points, so whether you’re new to appliqué or have more experience, you’ll find this technique both approachable and fun. Throughout the class, Jo Lynn will also share fascinating stories about the history and cultural significance of Hawaiian quilting, giving you a deeper appreciation of this timeless craft.
Come enjoy a stress-free day of sewing, with plenty of time to chat, connect, and relax with fellow quilters. No pressure, just creative fun!
SUPPLY LIST
- Purchase the pattern, “Tropical II” by Pacific Rim Quilt Company. You can order online at prqc.com
- Yardage requirement for quilt is on the back of pattern for requirements for more blocks. About 30” by width of fabric for top fabric and 30” by Width of fabric for back fabric
- Choose two contrasting fabrics for your quilt top and a coordinating print fabric for the backing, I used Batik fabric but 100% cotton will work.
- I recommend using wool batting for ease of quilting and beautiful results to show off quilting, you will not need this on the cruise.
- Wonder Under about 30”
- Thread for appliqué. I love to use Aurifil 100% cotton #60 thread. It needs to match the Applique fabric not the background fabric.
- Thimble
- Scissors, small and sharp to the point. I like Kai brand scissors—about 3 to 4 inches long, or Karen Kay Buckley with green or blue handles. You will also need paper scissors.
- Paper copy of your pattern
- Marking pencil. I like SewLine. You must have a color that will contrast with the Applique fabric.

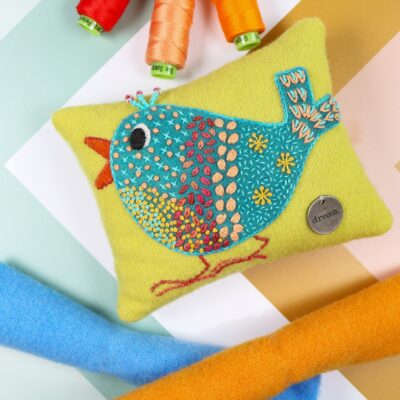
2 Day — Pinyon Jay Pincushion
Join Sue for 2 full days of stitching focused on bringing your Pinyon Jay to life! This little guy is achieved through wool appliqué and embellishment stitches. Feel inspired every time you reach for a pin by the adorable surprise token featuring one of many special power words.
Kit: $30 available at suespargo.com Please purchase for delivery to you prior to the cruise at https://www.suespargo.com/shop/pinyon-jay-
pincushion-46635?page=2&category=222#attr=23636
Homework: No
Supply List:
Pinyon Jay Pincushion Kit
#24 Chenille needle
#18 Chenille needle
#3 & #1 Milliners needles
Bullion Knot Long/Regular and Short/Fine
Freezer Paper
Wool Drizzle Pad
1/2” Stitch Spacing Ruler Set
Sewline Trio Chalk Pencil
Embroidery scissors
Fabric scissors
Clover applique pins
Applique Threads: EN08, 30, 47, 50
Embellishment threads: #8 EZ09, 18 and #5 EZ14, EZM20, 29
Creative Stitching Book
*All supplies available at suespargo.com prior to class*
Contact: Abby at shop@suespargo.com or 330-899-9454 ext 114
I
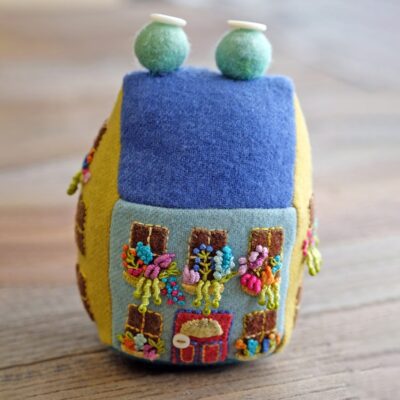
2 Day — Blooming Bungalow Pincushion
Join Sue for 2 full days of stitching focused on creating a quaint, 3-dimensional Bungalow with wool applique and layering. Utilizing several embroidery stitches, create
unique flowers, leaves and buds by filling the window boxes with an abundance of blooms.
Kit: $22 available at suespargo.com. Please purchase for delivery to you prior to the cruise at https://www.suespargo.com/shop/blooming-
bungalow-46640?page=2&category=222#attr=23568 )
Homework: No
Supply List:
Blooming Bungalow Pincushion Kit
#24 Chenille needle
#18 Chenille needle
#1 Milliners needles
Bullion Knot Long/Regular and Short/Fine
Freezer Paper
Wool Drizzle Pad
1/2” Stitch Spacing Ruler Set
Sewline Trio Chalk Pencil
Embroidery scissors
Fabric scissors
Clover applique pins
Applique Threads: EN27, 42
Embellishment threads: Size 8: EZ09, 10, 15, 21, 22, 26, EZM12 and
Size 5: EZ13, EZM75
Creative Stitching Book
*All supplies available at suespargo.com prior to class*
Contact: Abby at shop@suespargo.com or 330-899-9454 ext 114
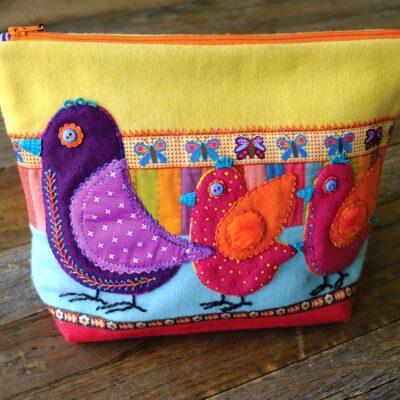
2 Day — Birds On Parade Zippered Bag
Join Sue for 2 full days of stitching to bring your little chics to life. In this class you will learn cotton, wool and velvet appliqué and all the embroidery stitches to enhance your parade of birds!
Kit: $42 available at suespargo.com. Please purchase for delivery to you prior to the cruise at https://www.suespargo.com/shop/birds-on-parade-46598?page=4&category=222#attr=23660 )
Homework: No
Supply List:
Birds On Parade Kit
#24 Chenille needle
#18 Chenille needle
#3 Milliners needles
Bullion Knot Long/Regular and Short/Fine
#11 Short Darner
Freezer Paper
Wool Drizzle Pad
1/2” Stitch Spacing Ruler Set
Sewline Trio Chalk Pencil
Embroidery scissors
Fabric scissors
Clover applique pins
Ellana Wool Thread #: EN59, EN49, EN39, EN23
Efina Cotton Thread #: EF06, EF47, EF58
Embellishment threads: #8: EZM04, EZM20, EZM31, EZM32 and #5: EZM36, EZM33
Creative Stitching Book
*All supplies available at suespargo.com prior to class*
Contact: Abby at shop@suespargo.com or 330-899-9454 ext 114
2 Day — Stitched Needle Roll
Join Sue for 2 full days of stitching focused on our Creative Stitching tools, the Spoke Easy and Loop Easy, the possibilities for these tools are endless! Create unique flowers, leaves, and stems to design a fantasy garden all of your own. Get creative and experiment with embellishing threads in varying weights, exploring stitches and stitch
combinations that will add incredible depth and texture to your work.
Leave this workshop with a beautiful cloth to turn in to a needle roll!
Kit: $30 available at suespargo.com. Please purchase for delivery to you prior to the cruise at https://www.suespargo.com/shop/teaching-
stitched-needle-roll-54263?category=242#attr=35382
Homework: No
Supply List:
Stitched Needle Roll Kit
#9 Short Darner needle
#24 Chenille needle
#18 Chenille needle
#3 #1 & #15 Milliners needles
Bullion Knot Long/Regular and Short/Fine
#24 & #20 Tapestry needles
Spoke Easy Templates
Loop Easy Templates
Circles Easy
1/2” Stitch Spacing Rulers
Bohin Glue Stick Pen
Embroidery scissors
Fabric scissors
Clover applique pins
Sewline Trio Chalk Pencil
Efina Cotton Thread #: EF49
Embellishment threads: #8, #5 and #3 Eleganza Thread, Other threads of your choice
Creative Stitching Book
*All supplies available at suespargo.com prior to class*
Contact: Abby at shop@suespargo.com or 330-899-9454
Block Prints
Quilt size 92” X 92””
Freeform blocks are abstract interpretations of traditional quilt blocks. How would you like to make triangle blocks without templates and marking with as few measurements as possible? See what
happens when you embrace the imperfections and irregularities of human hands. Organic cutting and piecing techniques mimic the appearance of block prints of India. Each block is different from
the next in size, shape and form, yet there is overall harmony and balance to the quilt. You will learn to trust your instinct and eyeballing skills to further explore many possibilities for the final
layout.
Technique: Machine Pieced, improve piecing
Level: Experienced Beginning Quilter
Supply List
- Basic Sewing supplies – scissors, pins,
- Rotary cutting supplies – 45 mm rotary cutter with sharp blade, 18” ruler, cutting mat
- Design wall
Yardage Requirements for the quilt top
While selecting fabrics, think of value and contrast. Select light medium and dark fabrics with various textures. Contrasting colors and textures create drama in any quilt
- Fabrics for the Blocks
16 to 18 Fat Quarters of light to medium value solids or tone on tone prints
16 to 18 Fat Quarters of medium to dark value small to medium prints - Book – Cultural Fusion Quilts
Pre-Class homework
Pre-wash and iron fabrics if preferred and follow the cutting instructions.
For the classroom purpose, precut at least 4 blocks worth of fabrics which requires 2 strips each from four different light/med and 2 strips each of four different med/dark fabrics.
Cutting the fabrics
From each light/med fabric: Cut 2 strips 5 ½”X 20”
From each med/dark fabric: Cut 2 strips 5 ½”X 20”
Make stacks of strips each containing two of the same dark and two of the same light strips. With the
right sides up, arrange them in alternating order. Pin each stack for easier handling.
Sujata Shah
Email: sujatashah450@gmail.com
Basket Full of Scraps
How can you make a crazy quilt crazier? Add a few scrappy baskets on top of it!
In this workshop, early on the focus will be on fabric selection and design development. You will go through the exercise to find balance with textures and colors of small to large scale prints. Working with solids, the emphasis will be on value and contrast. You will learn to make crazy patch background with freeform blocks and string
pieced baskets and their handles. Not interested in baskets? Try bowls, vases or something else. This workshop is a place to learn about scale, contrast, value, and selecting just the right fabric to brighten up the space.
Technique – Machine Pieced, Improv Piecing
Skill Level – Experienced Beginner
SUPPLY LIST
- Rotary cutter with fresh blade
- Medium Size Cutting Mat
- Design Wall or Twin Size Batting
- Freezer Paper
- Pins, Scissors, Applique needles
- Seam ripper
- Basket Full of Scraps Pattern – required
Fabric Suggestions
Background – Choose a wide variety of textures in the similar color family. Do look to the neighboring color on the wheel to add depth to the background. For instance, if the background is blue, add a range of blues as well as purple and green to create more depth and interest.
You may choose to work with similar textures or mix and match geometric and organic patterns. For example, choose all the plaids or stripes, or mix large and small florals in the mix.
Baskets – Choose contrasting fabrics to the background with some prints also consisting background colors. You are going for a busy look in your quilt but also have some defined baskets on the background. Make sure there is enough contrast of values between background and the baskets. Include a variety of prints and textures like dots,
stripes, and florals.
Yardage
- Background
Choose assorted small, medium and large scale prints of similar colors, including dots, some plaids and stripes. It is
always a good idea to bring a large variety of fat quarters and 1/2 yards cuts. - Baskets
Pick one large print from the background fabrics to use as a starting point to select contrasting colors for the baskets. Choose fabrics with small and medium prints of brighter colors and various textures. - Handles
From the fabrics selected for the baskets, cut 8-10 bias strips in lengths of 20″ to 24″ folded and pressed with wrong sides together.Be prepared to share fabrics with the fallow classmates. You will take home a whole lot more memories than just a
quilt top.
Sujata Shah
Email: sujatashah450@gmail.com
Crossroads
Finished quilt: 60 ½’’ X 60 ½’’
Finished Block: 6’’ X 6’’
Freeform blocks are abstract interpretations of traditional quilt blocks. How would you like to make quilt blocks without templates and marking, with as few measurements as possible?
See what happens when you let loose and embrace the imperfections and irregularities of human hands. Every block is different than the next, yet there is an overall harmony and balance to the quilt.
You will learn to trust your instinct and eyeballing skills to make a whimsical quilt with a personality.
Yardage Requirements for the quilt top 60” X 60”
Blocks:
1/3 yard each, total of 25 prints and solids
Backing: 4 yards – Do not need to bring on cruise
Binding: ⅝ yard – Do not need to bring on cruise
Batting: Twin – Do not need to bring on cruise
Supplies
- Medium size cutting mat
- Rotary cutter with fresh blade ( very important)
- 6 x 12 ruler with extra blade
- Scissors
- 9 1/2″ Square ruler (Optional)
- Basic Sewing Supplies
- Cultural Fusion Quilts book (required)
Pre-Class homework
Pre-wash and iron fabrics if preferred
Follow the cutting instructions and pre-cut squares
Cutting the fabrics
From each 1/3 yard:
Cut 1 strip 9’’ X width of the fabric. Crosscut 4 squares 9’’ x 9’’
Make 25 stacks of squares each containing two dark and two light squares. With the right sides up, arrange them in alternating order. Pin each stack for easier handling.
My book is Cultural Fusion Quilts. I highly recommend that participants have it on hand. It is filled with 15 fun projects. The whole process of freeform blocks is pretty addicting, and I hope they make more than just one quilt.
Lattice
LATTICE
Finished quilt: 60 ½’’ X 60 ½’’
Finished Block: 6’’ X 6’’
This process based class is designed to focus on cutting gentle curves through multiple layers of fabrics and sew the pieces into freeform lattice blocks. Learn how is it is to create depth and dimension of a wooden hand carved window in a quilt. Sujata will share many tips on making Free-Form blocks and offer many suggestions for color combinations and layouts during the class.
Yardage Requirements for the quilt top
Fabric requirements are suggesting floral prints for a traditional quilt. Choose bold and solid fabrics for modern and non traditional look.
Blocks:
⅞ yard each of 4 medium scale prints
⅞ yard each of 2 large scale prints
⅞ yard each of 2 accent colors
⅞ yard each of 2 light and small prints of accent color one
Backing: 4 yards – do not need to bring on cruise
Binding: ⅝ yard – do not need to bring on cruise
Batting – Twin – do not need to bring on cruise
Supplies
Medium size cutting mat
Rotary cutter with fresh blade ( very important)
6″ x 12″ ruler with extra blade
Scissors
9 1/2″ Square ruler
Pre-Class homework
Pre-wash and iron fabrics if preferred.
Follow the cutting instructions and pre-cut squares.
Cutting the fabrics
From each 7/8 yard:
Cut 3 strips 9’’ X width of the fabric. Crosscut 10 squares 9’’ x 9’’
Make 25 stacks of squares each containing two dark and two light squares. With rightsides up, arrange them in alternating order.
Pin each stack for easier handling.
Cultural Fusion Quilts Book – required

Organized Chaos
56’’ X 56’’
Advance beginners
A quilt so scrappy and mysterious, one glance is simply not enough! Traditional kaleidoscope blocks made with a super eclectic array of fabrics to reflect the charm of African American and southern quilts.
During the class, the focus will be on how to organize a riot of colors and prints in a harmonious way to make Kaleidoscope blocks. Each block is different from the next and so much fun, you wouldn’t want to
stop making them. In this class you will learn how to make transparency and contrast with pairing different colors and values.
Supplies
Medium size cutting mat
6″x 12″ruler
Rotary cutter
Basic Sewing supplies- scissors, pins
Kaleidoscope ruler by Marti Mitchell (required)
Design wall (required)
Organized Chaos Pattern (required)
Fabric Suggestions
Bring an eclectic collection of small-scale print fabrics. Throw in some odd fabrics into the mix for added interest. Be mindful of adding light, medium and dark value in the mix. You want the quilt to look
scrappy, be in the mindset to use materials on hand. Be prepared to share and swap fabrics with your classmates. (Not mandatory but a fun process)
You will be working with pieced strips so please do not bring small scraps to the class.
Yardage Requirements
30 Fat quarters or ¼ yard cuts of small to medium prints in contrasting colors.
Cutting prior to class
Cut 2 strips – 2 ½’’ x WOF from each fabric for the blocks.
Cut 8 Squares – 3 ¼’’ x 3 ¼’’ from each fabric.
Cut diagonally once to make 16 corner triangles.
Paper Beads
Inspired by beaded necklaces made from recycled magazine papers by African women, this quilt is a fun version of a string quilt. Celebrate imperfections and irregularities of handmade crafts through
improvisational blocks as well as the borders. This workshop will focus on design elements like color, texture ad value in prints and on choosing perfect background for a string quilt.
Technique: Machine Piecing with freeform cutting and improv Piecing
Skill Level – Experienced Beginning Quilter
Supplies
Paper Beads Pattern (required)
Basic Sewing supplies – scissors, pins,
Rotary cutting supplies – Cutting mat, rotary cutter with sharp blade
6” X 12” ruler
Design wall
Fabric Suggestions and Requirements
Choose strips of vibrant colors, mixed with textures like plaids, dots in high contrasting values to create depth and pops. For the background selection, bring multiple possibilities in half yards.
Yardage for the quilt
3 yards total of Strips varying in widths anywhere fr om 1 ½” to 2” for blocks of beads Include dark, medium, and light values of fabrics to have an exciting final look in the quilt.
3 yards of solid for the background OR 4-5 half yard cuts for selection during the workshop
¼ yards each of one solid and one print for upper triangle border
¼” yard each of contrasting fabrics for lower diamond border (one large and one small scale print)
Sujata Shah
Author of Cultural Fusion Quilts
Email: sujatashah450@gmail.com
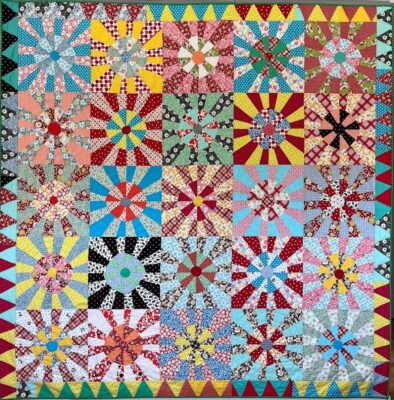
Sunburst Quilt
96” X 96”
Finished Block size 16” X 16”
Inspired by American Folk Art quilts, this block is perfect for spring or summer projects. The question one might ask is, if it’s possible to make a Sunburst block with Dresden Plate centers without any templates and applique. The answer is, yes! This two day class is designed to focus on cutting multiple curves through layers of fabrics and sewing the pieces into Free Form flower blocks. It is easy and fast.
Sujata will share many tips on making the Pinwheel blocks and offer suggestions for color combinations and layouts during the class. You may not stop at just one.
Yardage Requirements for the quilt top
Blocks and Borders
1/3 yard each of 25 light colorful, prints and solids.
1/3 yard each of 25 medium to dark prints and solids.
Supplies
Sewing Machine
Medium size cutting mat
Rotary cutter with fresh blade
6″x12″ ruler
9″ Square ruler
Basic sewing supplies – pins, needles
2-3 sheets of freezer paper -for making templates for the centers
Scissors
Sunburst Pattern (Required)
Pre-Class homework
Pre-wash and iron fabrics if preferred.
Follow the cutting instructions and pre-cut squares.
Cutting the fabrics
From each 1/3 yard:
Cut two, 11” X 11” squares for total of 100 squares. Set aside the remaining fabrics for the borders.
Make 25 stacks of squares each containing 2 squares each of the light and dark prints. With the right sides up, arrange them in alternating order. Pin each stack for easier handling.
Kawandi – hand stitching
A utilitarian quilt made with found and collected scraps by African Diaspora of India.
Document the memories and special events of life with stitches. From start to finish this is a complete hand stitching project. Focus of this workshop will be on being spontaneous while selecting scraps and learn to personalize simple patchwork by using colors and fabric of your life. Sujata will share how to find rhythm of your own between your mind and body and practice mindful stitching. Geared for all levels.
Supplies
- Neutral color thread for basting
- Fabric scissors
- Thimble
- Needle grabber (optional)
- Embroidery needles Bohin #7 OR of your choice
- Wonderfil Specialty Thread – Spaghetti – Weight 12 Color: White or Ecru OR of your choice
- One 22″ x 22″ piece of lightweight fabric for backing
- 21” X 21” square, thin batting – Quilter’s Dream (request) Or loosely woven fabric
- 3” to 5” wide cut or torn strips of bright and lightweight fabrics and scraps
Fabric Suggestion:
To make the process interesting and engaging, please include random scraps of many different size, colors, and textures in your scraps bag. Lightweight fabrics will make it easier to stitch through multiple layers of fabrics. Add some shot cottons, plaid, prints and stripes to the mix. Make sure to add a scrap from a personal clothing item. Do not use batiks or heavy weight fabrics for this project.
Email: sujatashah450@gmail.com

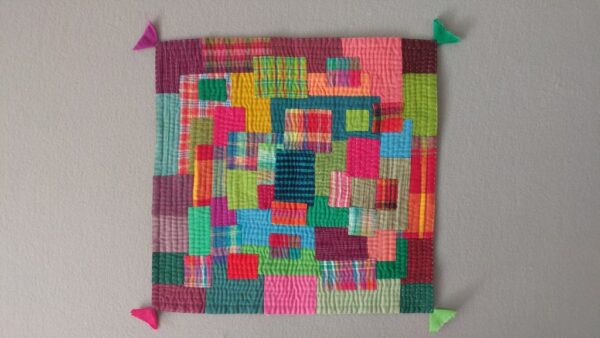
Interleave
Interleave is a unique and innovative stitching technique that will allow you to explore the art of creating vivid, dynamic designs using quilt-as-you-go techniques. You’ll learn how to piece together thin strips of fabric, sewing them onto a foundation of backing and batting.
By alternating two sets of fabric strips, you’ll craft intricate patterns that create an optical illusion, much like viewing two images through venetian blinds.
You will be working towards the completion of an 18″ square piece, perfect for use as a wall hanging or for combining with other pieces to create a larger quilt. This workshop is ideal for anyone looking to master both design and craftsmanship in quilting.
Supply List:
- Pencil
- Pins
- Water soluble marking pen
- 18-inch ruler
- Cutting mat
- Rotary cutter
- Fabric scissors
Kit includes all material necessary to complete an 18” square piece:
quilt block template, backing fabric, wadding and access to a selection of Kaffe Fassett’s fabrics for the top.
Kit will be available to purchase and collected on the day of the workshop. Price to follow.
FUN WITH FANS
In this workshop, you’ll dive into the elegant Fan block, a unique blend of traditional patchwork that combines both appliqué and piecing techniques.
I will share my go-to technique for achieving perfectly constructed radial segments every time, which can be applied to any curved quilt blocks.
This versatile block is ideal for playing with colors and patterns, letting your imagination shine. Inspired by Kaffe Fassett’s Dotty Fans quilt which I stitched for his book ” Quilts in America”, I’ve explored many variations, and now you can too.
This is a fun, skill-building class where you’ll discover endless ways to make this block your own!
Supply List:
- Small cutting mat (A4)
- Rotary cutter
- Quilting Ruler
- Add-A-Quarter Ruler (recommended)
- Fabric scissors
- Pencil and erasure
Kit includes access to a selection of Kaffe Fassett’s fabrics, FPP paper, and instructions to complete the project.
Kit will be available to purchase and collected on the day of the workshop. Price to follow.
TOTE-ALLY CHIC: A PATCHWORK BAG – one day
This immersive workshop is designed to guide you in crafting a unique, stylish tote bag that combines the timeless charm of patchwork with a creative twist on traditional Kantha stitching.
You will explore the fundamentals of shape, color, and fabric composition, transforming fabric remnants into a beautifully functional piece that reflects your personal style.
With a blend of technical guidance and room for personal expression, this workshop offers the perfect balance between precision and artistic freedom.
Supply List:
- Cutting mat
- Rotary cutter
- 18-inch ruler
- Fabric scissors
- Pins
Kit includes all material necessary to complete the project: fabric for lining and handles, access to a selection of Kaffe Fassett’s fabrics for patchwork, wadding and instructions to complete the project.
Kit will be available to purchase and collected on the day of the workshop. Price to follow.

KAWANDI a la Fassett Style
KAWANDI (QUILTING) USING KAFFE FASSETT’S FABRIC – one day
In this workshop you will learn how to make your own beautiful Kawandi using Kaffe Fassett’s gorgeous fabrics. Kawandi are traditional quilts of the Siddi community of India, which are typically made from sari scraps patched together from the outside in.
This technique is very organic and relaxing and gives the finished quilt lots of texture. Unlike traditional quilts, Kawandi are pieced and quilted at the same time making this technique perfect for a beginner quilter or for a project ‘on the go’.
Supply list:
- Crewel sharp needles size #5-10
- Fabric Scissors
- Needle threader (optional)
- Thimble (optional)
Kit includes all material necessary to complete a small 12-inch square Kawandi: backing fabric, wadding, access to a selection of Kaffe Fassett’s fabrics,
Aurifil 12wt cotton thread.
Kit will be available to purchase and collected on the day of the workshop. Price to follow.


EPP GOES HAWAIIAN – 2 days
English Paper Piecing Goes Hawaiian
English Paper Piecing has become very popular again. It’s no longer just a Grandmother’s Flower Garden block. Let’s play with EPP and have fun making medallions or blocks that may turn into a quilt, embellishment for a garment or a tote bag.
The sample uses ¾” hexagons surrounding a conversation fabric. You may choose to use any EPP patterns or papers you have and get creative with something small or start your next masterpiece.
The tote bag pattern in the sample is a free pattern that can be found here: www.wilmingtonprints.com search under free patterns for BASIC Tote Bag #2 (2 versions)
Supplies:
- EPP papers-these can be purchased from many places and can be downloaded and printed on cardstock, then hand cut or cut with a cutting machine.
- Needle-your favorite hand sewing needle. Mine is a Tulip Applique #10 Big Eye.
- Thread-junk thread for basting. Good thread in neutral colors for sewing pieces together.
- Glue Stick-Elmer’s Washable Glue Stick, Sewline or any other that is water soluble.
- Pencil-mechanical pencil, not fine tip. Dark and light colors.
- Thimble-bring your favorite. If you aren’t a thimble user, I suggest a Clover plastic adjustable. They are very inexpensive and can be found at JoAnn’s or Hobby Lobby.
- Fabric-any cotton fabric to get started. For the EPP, it doesn’t take a lot of each one.
- Background fabric- If you choose to make the tote bag with you EPP pieces, yardage as listed on the pattern will be needed. We will not be making the totebag in class, but help will be given for it to be completed later. More information about that later. If you wish to use these for clothing embellishments, or start a quilt you will need background fabric for your project.
Questions? Contact Vickie at ssttipe@aol.com

APPLIQUE TO MAKE YOU SMILE – 2 days
Have you ever wanted to try Applique, but didn’t know where to start? Happy Birds and Happy Flowers by Jo Avery are the perfect designs for learning to applique and embellish your blocks. Both needleturn and prepared edge applique will be taught. Since personal irons are not allowed on ships, we will be using a glue method for the prepared edge.
Spice up the blocks with embroidery and rick rack . Let your imagination run wild. The applique fabrics should be tone on tone, small plaid, Grunge, even woven solids, so the embellishment shines.
Please order your pattern from Jo Avery at https://joavery.co.uk , The patterns are sold individually or as a complete set and are downloadable. It’s so hard to choose just one because they are all fantastic and put a smile on your face. Make a working copy of the design you choose to start with (we will mark on it and cut it and your original will remain intact).
The center square is an original pattern by myself and will be available at a later date.
Supply List:
- Pencil (both graphite and white chalk)
- Scissors-paper and small fabric (I use Fiskars 4”)
- Applique Needles-if you have favorites, they will work. ( I use Tulip Applque #10
Big Eye. These are relatively new and the larger eye is fantastic for older eyes) - Embroidery Needles-Any embroidery needle. Mary Arden has packages of assorted sizes
- Glue- Both Glue Stick and Applique Liquid Glue (Glue Sticks can be the refillable from many vendors or Elmer’s Washable School Glue. Liquid Glue can be Roxanne’s Glue or a bottle of Elmer’s Washable School Glue.
- Thread-to match your top applique fabric. (I use DMC 50 wt machine embroidery thread or Mettler 60 wt green label embroidery. Aurifil has a wonderful 80 wt thread.
- Embroidery Floss-DMC was used in the sample
- Rick Rack- older cotton rick rack is great. Smaller sized and various colors. Only small amounts needed so we can share and I will have assorted packs that can be purchased for a very nominal price.
Fabric-Background fabric and applique fabrics. The pattern has great color pictures.

Catherine’s Wheel in the Tropics – 2 days
Hand piecing can be both relaxing and fun. Some quilts are easier to hand piece than to machine piece, so let’s learn some basic techniques to get you off to a good start.
The sample is Jen Kingwell’s “Postcard Partners” pattern Catherine Wheel. The “Postcard Partners” contain the instructions for four quilts and templates to make them all. Catherine Wheel is perfect to add a large conversation fabric between the pieced blocks. Make blocks and purchase some fabric in Hawaii to use as the conversation prints in between the pieced blocks.
Purchase your pattern from https://suespargo.com or other quilt shop. If you already have a pattern you would like to hand piece, feel free to work on that instead.
***Please make a copy of your template pieces. This will save time, so the template will not have to be traced.
Supplies:
- Pattern of your choice
- Fabrics as needed for your pattern
- Scissors- both paper and small fabric
- Needles-I use the same needle I use for Applique, Tulip Applique Size 10 Big Eye
- Thread-I use the same as I use for Applique. Neutral colors as if you were machine piecing
- Cardboard-please bring a cereal box type cardboard, it will be used in conjunction with the templates that might come with your pattern. *If you do not have plastic templates this is very important.
- Glue stick-can be Elmers Washable Glue stick
- Pins-a few pins, the finer the better.
- Thimble
- Small ruler with a ¼” line. Length and width of ruler do not matter, just need a ¼’ line on the ruler.


Tropical Broderie Perse – 2 days
Build a floral arrangement by cutting flowers, birds, bees, and butterflies from fabric. Broderie Perse originally used floral chintz fabrics to cut floral motifs and rearrange to make beautiful quilts. The Chintz came from England and was expensive, so everything was used. No piece was too small. Our version will use cuttings from floral fabrics you might have been saving or buy some tropical prints and enjoy making an arrangement.
There is no pattern to purchase. Just as in arranging flowers in a vase we will be arranging fabric flowers in our vase. Maybe you would like to make a wreath instead of a vase. The possibilities are endless. I will have a variety of vase templates for you to choose from or you might want to draw your own.
Choose a background fabric. Its good to have light background floral fabric if you are using a light background for your applique base. The same goes for dark. When the flowers are cut out if the background colors are similar the flower pieces tend to blend in better. Don’t worry if they don’t match, this is fun and it will work. Take a look at your fabrics and bring small pieces, no need for yardage.
Supplies:
- Background fabric-17” square
- Applique Fabrics-more is better, but you don’t need yardage. Pick some florals with small and medium flowers. Butterflies and I even through in a parrot.
- Vase fabric-if you are making a vase, bring a piece about 9” x 12”. If making a different vase bring a size needed for your vase.
- Scissors-very important. I use the 4” Fiscars scissors. Ones that will cut fabric are very important. Bring your favorite.
- Needle-Applique needle (Tulip Applique #10 Big Eye)
- Glue-Roxanne’s Glue Baste or Elmer’s Washable School Glue
- Thread-your favorite applique thread. The sample was sewn with one neutral color and a green to match the vase.
Questions? Contact Vickie at ssttipe@aol.com
